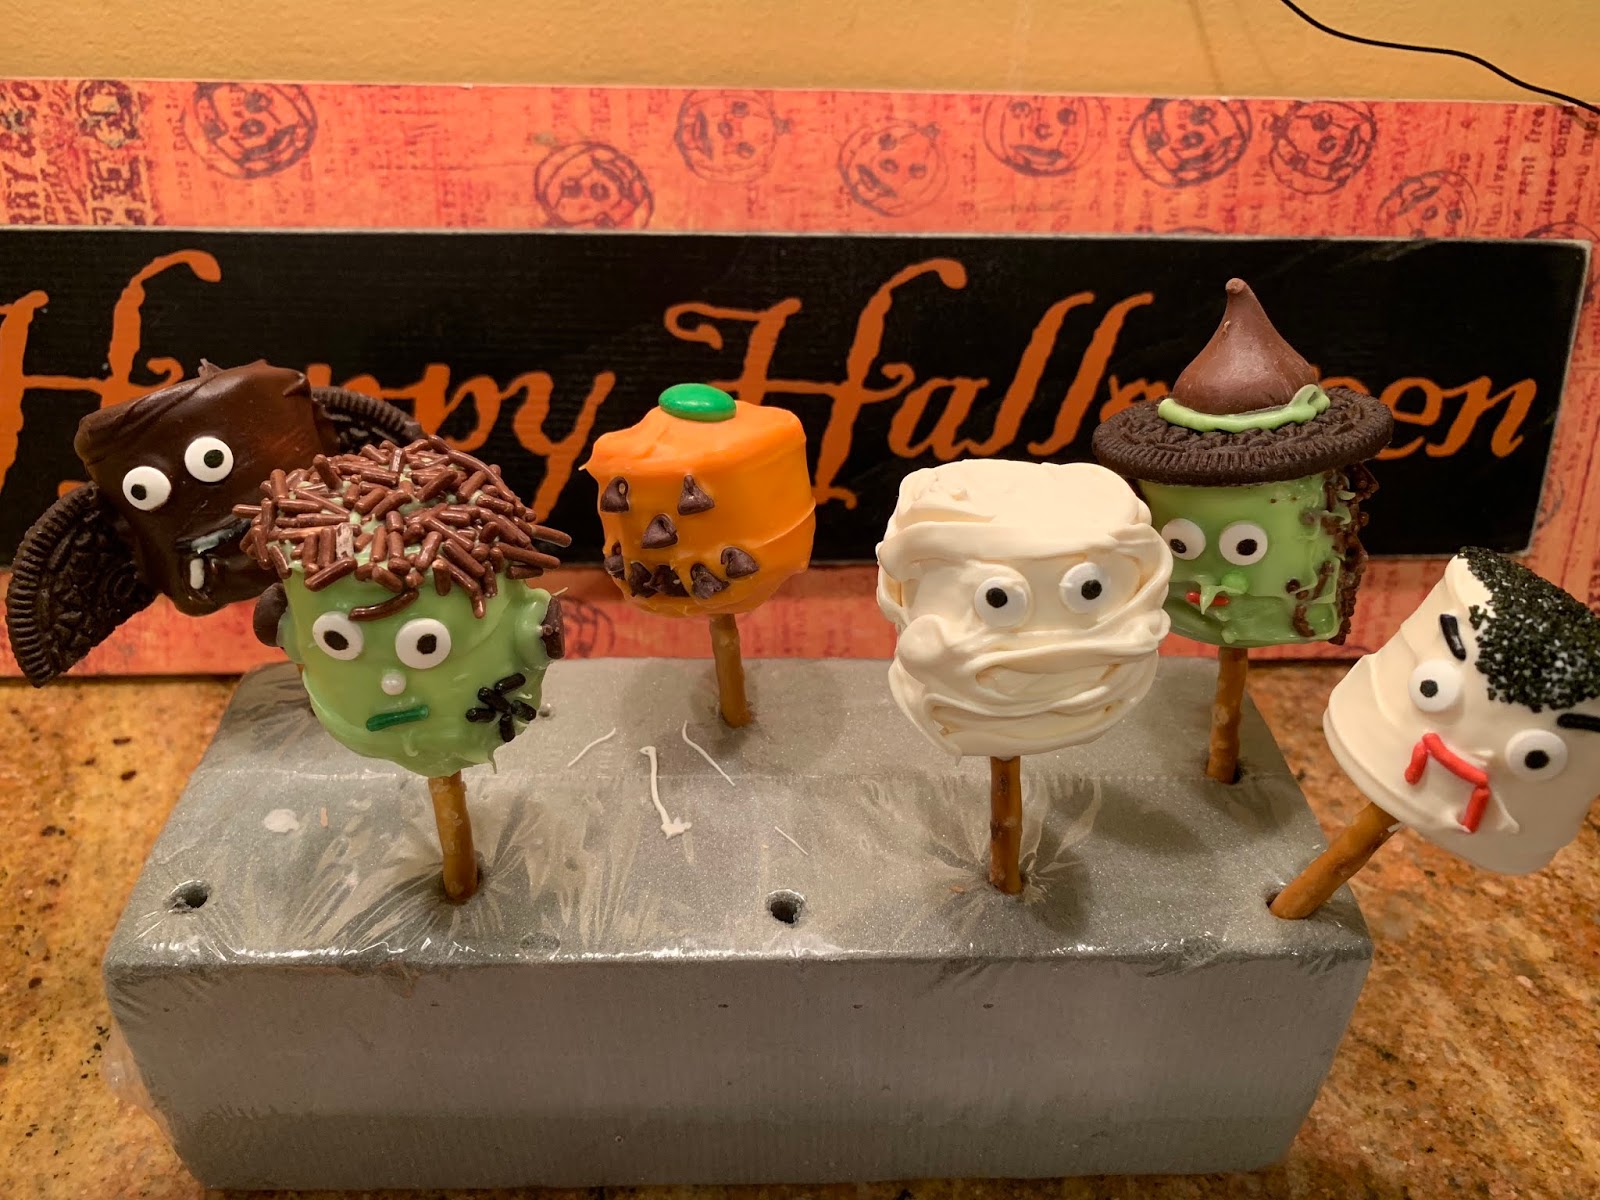
I volunteered to make a cupcake treat for my younger daughter’s class Halloween party next week. After much brainstorming, I decided I wanted to make simple mini-cupcakes and top them with a festive cake topper: marshmallows decorated like monsters!
Besides knowing it would look really cute, I was further drawn to this idea because I knew I could make the monster marshmallows several days in advance and store them in an airtight container until the day before the party when I make the cupcakes. That means the most time-consuming part of the process – and time-consuming it most definitely IS—is completed ahead of time.
I found some inspiration on general looks and monster ideas from a marshmallow candy pop post on the I’ll Wash You Dry blog, but I put my own spin on the decoration, and also don’t plan on serving them as pops.
I’ve actually made marshmallow pops before. A year or two before I started blogging my countdown to Halloween, I made a whole batch that looked like Frankenstein, and on Halloween I put one in my daughter’s lunchbox in a wooden coffin box I found at AC Moore, and fashioned a body out of carrot sticks and pear. It was totes fun and adorable.
 |
| The original batch |
 |
| They came up in my Facebook memories at the perfect time! |
 |
| Spooky lunchbox edible Frankenstein |
I haven’t made decorative marshmallows since because they’re rather labor-intensive and time-consuming. And mine perhaps more than some others I’ve seen online because I use assorted candies and sprinkles for the monster features (as opposed to using an edible pen or gel icing or the like) which means I painstakingly place individual jimmies (aka sprinkles) to serve as mouths or fangs or eyebrows, and that takes lots of time! Plus, like, I'm sorta slow when I cook.
This time out, I wanted to make several different types, and because I did so many kinds (involving several different color melts) it took me about 3 hours to decorate 36 of these.
Don’t be daunted. They look so cute I actually think they’re worth it! (Plus, I had to stop a 64 times to take pictures. I’m sure that ate up time. Haha!)
Let me walk you through how it’s all done, including my Top 3 Tips for Success.
Tip 1: Make a plan (and consider quick swaps, just in case you need them)! This is important because it helps keep you organized and on target, and there’s less likelihood you’ll get off track or confused or overwhelmed. If you know your desired yield up front (for instance, 6 different marshmallow designs), you’ll be able to work smarter to execute your plan because you won’t waste or run out of supplies partway through.
 |
| Here's my mock-up plan, so I had a sense of how these would come together |
Tip 2: Prep your ingredients before you start! Take the time to set out everything you’re going to need for the entire job. That might mean your whole table or counter is full of supplies (and you might discover you have a bit of a sprinkle-buying habit you need to get under control…), but that’s ok because it means you won’t need to stop in the middle of your work and go off to find something, and it also means you won’t panic in the midst of your decorating when the thing you planned to use is suddenly all gone or missing.
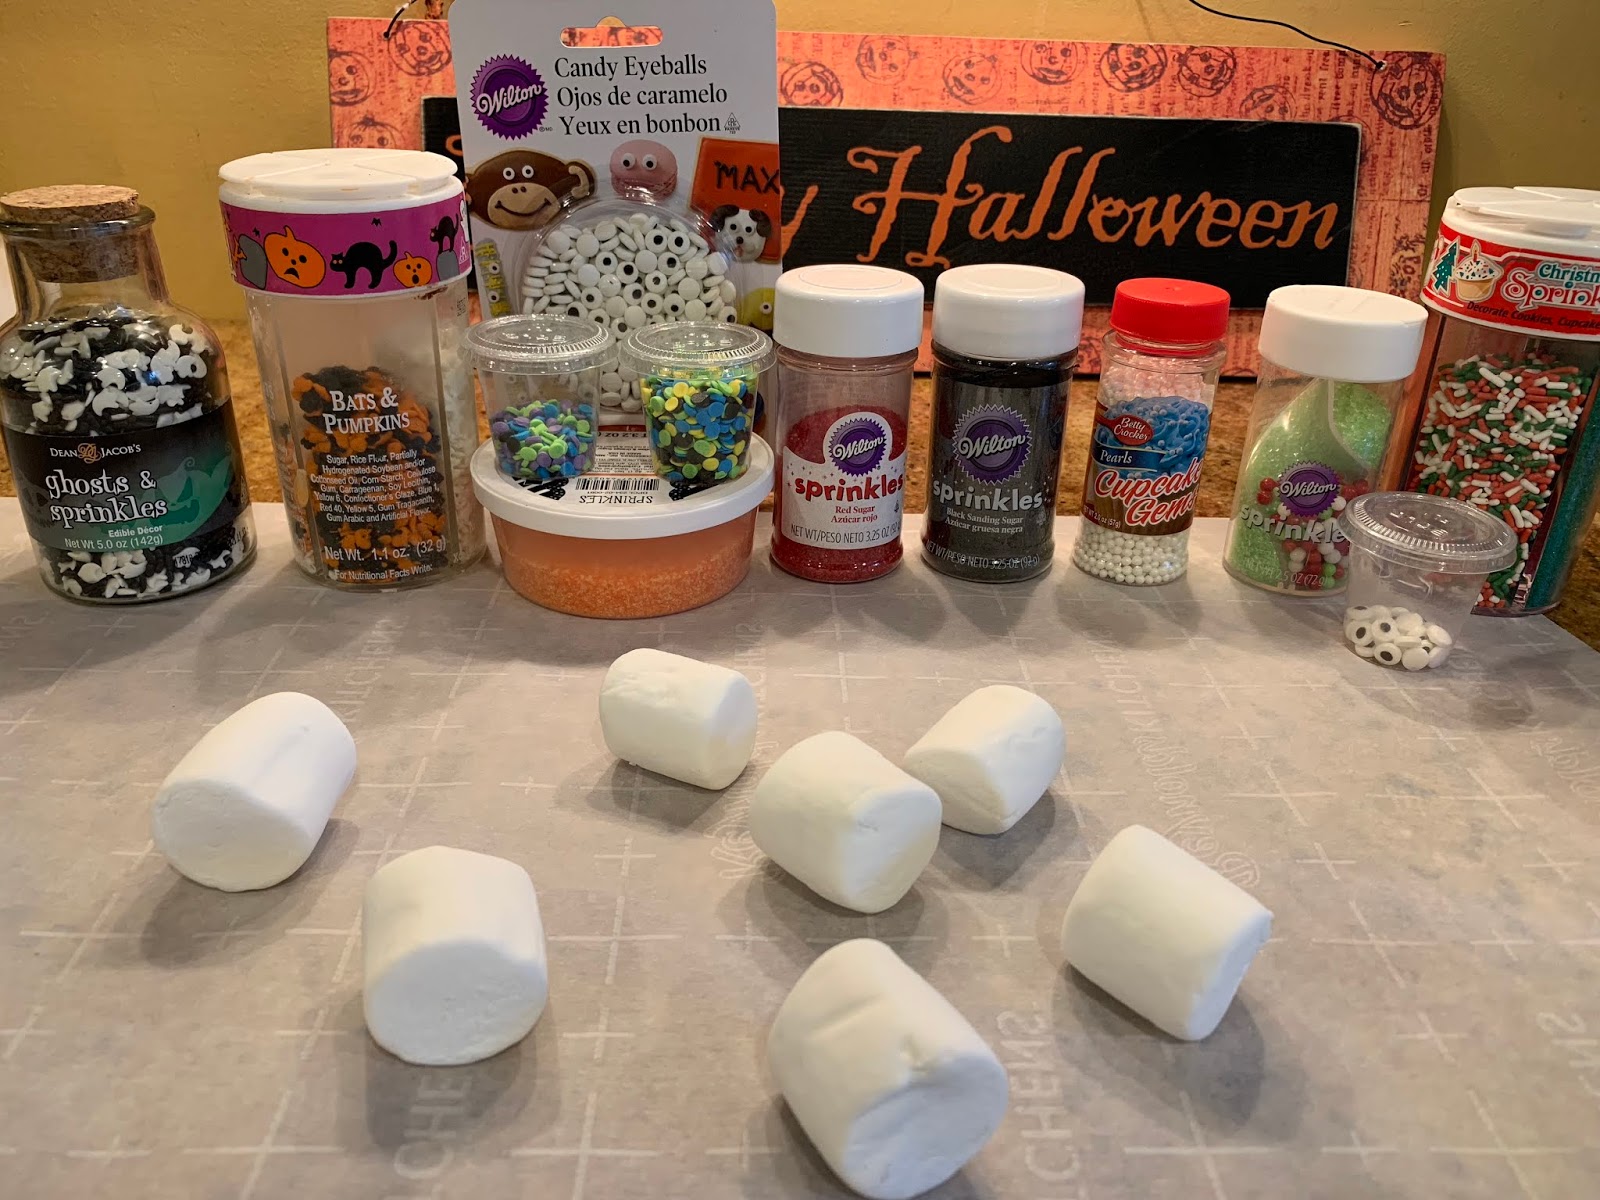 |
| Believe it or not, I have at least 10 more jars of decorating supplies |
Be like Santa and check that list twice! I thought I’d done everything, but it turns out I didn’t have my clear candy sugar ready before I started. I only realized my oversight as I stood there holding a quickly-drying mummy. I had to do a one-handed search of my cabinet but I couldn’t find it and had to forgo the sugar. (Side note: I found it today…) Had I double-checked my list, I could have taken my time locating what I needed before I began and I wouldn’t have had to change my plan.
Also be sure to prep the Oreos you need for the witches and bats. Open the Kisses, count out the chocolate chips, set up a ramekin of jimmies, lay out the eyeballs and the individual jimmies for the mouths—all of it. Have everything ready to go off to the side so that when you are about to tackle that group of marshmallows (see Tip 3), you only need to spend a few minutes arranging it so you can quickly decorate the monsters.
 |
| A little mise en place goes a long way |
One more thing you’ll need? Some craft/flower foam in which to stick the completed, still-wet marshmallows so they can set. (I read somewhere you could also use an inverted egg-carton, but the time I tried it, it wasn’t as sturdy as I would’ve liked, so I prefer the foam.)
Tip 3: Break your BIG TASK into smaller chunks. You can only make one marshmallow at a time. Because the melts set kind of quickly, you can’t dip them all and then go back and decorate the faces later. You have to dip and decorate each one, one at a time, and work quickly. I organized myself based on monster (obviously) and melt color. I started with the green melts for my witches and Frankensteins, then tackled the dark chocolate bats, followed by the orange pumpkins, and I ended with my white melts for Dracula and mummies. As per Tip 2, I had everything I needed for each monster on the parchment I had set up as my work area, all at the ready for placement on the marshmallows before the chocolate dried.

Now that you have the tools, let’s get started.
1. Lay out a long piece of parchment paper to serve as your work surface.
2. Prepare your marshmallows. If you make these as actual pops, you’d stick a lollipop stick into each one. But I’m using mine as cupcake toppers, so I don’t want a long stick, but I did need something to hold as I was decorating and they dried, and even to add some support within the cupcake. I decided to use an edible ingredient: a short, thin pretzel stick. It worked perfectly!
Start by gently inserting a thin pretzel stick into one of the flat sides of your marshmallow. Push it up until you can sort of feel it reach the opposite end of the marshmallow, but before it presses out/punctures the other side.


3. Melt the candy coating you’ll need for that grouping of monsters. (I’ll note the quantities in the sections below. But as a rule of thumb, figure you’ll need about 2.5-3.5 ounces of candy melts for 6 marshmallows. I erred on the high end because I didn’t want to have to stop and melt more along the way. I had extra in all cases and simply spread out the excess on my Silpat sheet and topped it with sprinkles, cookies, and pretzels and gave it to my girls as a bonus treat.) Follow melting instructions on package directions. I add ¼ teaspoon coconut oil or shortening to my melts to smooth them out a bit. That’s optional.
 |
| Here's my extras. Candy bonus. |
Note that as you work, you will need to reheat your melts to reach the proper consistency again. After 3 or 4 marshmallows, I found the candy coating setting on the marshmallow almost immediately. I would simply reheat the melts (usually just for one 30-second 50% power cycle) and I could work at a normal pace once more.
4. Lay out your supplies for the monster you’re making.
 |
| Vampire prep: Eyes, eyebrows (black jimmies), and mouths with fangs (red jimmies). Not pictured: dusting sugar in bowl. |
 |
| Frankenstein prep: hair, mouths, bolts, scars |
 |
| Witch prep: hat brim, hat point, eyes, mouths, warts |
Witches and Frankensteins
You’ll need:
For both
6 ounces green candy melts
¼ teaspoon shortening or coconut oil
2 Tablespoons brown jimmies (in small bowl)
 |
| Step 1: Melt the candy melts |
 |
| Step 2: Use a small spatula to cover all sides of the marshmallow. It needn't be totally smooth because these are monster faces and monsters rarely have smooth complexions. |
Now it's time to decorate. Remember, you will work ONE AT A TIME, completing an entire marshmallow before repeating that same process 5 more times. You need the candy melt to stay tacky for the duration of your decoration. (If you find the candy melt becoming hard to spread or setting too quickly, you'll need to reheat them.)
For Frankenstein
12 candy eyeballs (small or medium size)
Black or brown jimmies for scar – I used 3-5 per scar
12 chocolate chips
6 red jimmies
6 round white candies
 |
| Hold the pretzel and dip the top into brown jimmies |
 |
| Now he has hair! |
 |
| Dip the pointy tip of a chocolate chip into a small dab of green melt then gently press into one side of Frank's head. Repeat on the other side. (I should have moved my "bolts" down closer to the bottom.) |
 |
| Press eyeballs into place. Carefully add a green Jimmie as a mouth. To one side of his mouth, make a cross-hatch pattern of 3-5 black jimmies to act as a scar. |
 |
| Add a candy dot for a nose. |
 |
| Here's a better shot of his "scar." Place in a craft foam block to dry. As soon as the candy melts are set, you can remove them from the blocks and store upside down or on their sides in an airtight container. |
For witch
6 Kisses
6 Oreo cookies (scrape out & discard the filling from 3 cookie sandwiches)
12 candy eyeballs (small or medium size)
6 red jimmies
6 green round candies (quins or balls work well here)
Cover the marshmallow in green candy melt as above and then:
 |
| Dip the right and left sides of the marshmallow into the brown jimmies. This is her hair. I didn't bother doing the back- she's just bald back there. |
 |
| Press an Oreo on the flat top of her head as the base of her hat. |
 |
| Add her candy eyeballs, a red jimmie as her mouth, and a green candy as her wart. (When she's dry, we'll go back and add her nose.) |
 |
| Place witches in blocks to dry and as a base support before completing her hat. |
 |
| Dip the bottom of a Hershey's Kiss into the green candy melt. |
 |
| Gently press the base of the Kiss onto the center of the Oreo. The melt will ooze out and form a decorative strip, and it'll serve as a glue to hold the Kiss in place. |
 |
| Take an extra jimmie and dip it into a little green melt. |
 |
| Lightly dab the green melt in the area where her nose should be, (as though you were going to stick the jimmie on her face) but then pull it gently away from her face. |
 |
| The candy melt will stick out and bend like a witch's nose! |
 |
| Some side views so you can see her nose sticking out. Cool, huh?! |
Bats
You’ll need:
3.5 ounces dark chocolate candy melts
¼ teaspoon shortening or coconut oil
12 candy eyeballs (small or medium size)
6 longish brown jimmies
12 shortish white jimmies
3 Oreo cookie sandwiches, halved (scrape out and discard the filling from 3 cookie sandwiches, then cut each cookie in half again *see photo and note below)
Preparing the wings:
After you open your Oreo and gently scrape out the cream filling, you need to cut each cookie in half. USE A SERRATED KNIFE AND GENTLE SAWING MOTIONS. The first time I did it, I used a chef’s knife and the cookie cracked. When I decided to try my large bread knife and slowly, gently sawed at the cookie, I achieved a beautiful, clean cut. You can see in the photograph what a difference it made.
 |
| Scrape out the filling. |
 |
| Here's where I tried using a chef's knife. |
 |
| See the top left and top right cookies? The broken ones? Yeah, the chef knife was a no go. See the cleanly halved cookies on the right side? Serrated bread knife, baby! |
 |
| Use a serrated bread knife and a gentle sawing motion for a clean cut. |
A note about the candy melts: I have found in the past –and it was true again with this experience—that the milk and dark chocolate melts tend to be runnier and of a more dippable consistency than are the white and colored melts. Whereas I had to use my spatula to paint on all the other melts, the chocolate melts were drippy. I used my spatula to smooth out the chocolate after I dipped it, but I was able to dip in the first place.

 |
| After dipping and smoothing the chocolate onto the marshmallow, place the eyeballs in the proper spots. |
 |
| Flip to the other side and add an Oreo half to the middle of the back. Depending on how thick your chocolate is, you may need to dip the edge of the Oreo into more chocolate. |
 |
| Add the second wing. |
 |
| On the front, add a black jimmie for a mouth |
 |
| Then add two small white jimmies as fangs |
Jack o’ Lanterns
You’ll need:
3.5 ounces orange candy melts
¼ teaspoon shortening or coconut oil
48 mini chocolate chips
6 green M&Ms

 |
| Paint it on with a spatula |
 |
| Pop a green M&M on top as the stem |
 |
| Place mini chocolate chips in the form of a face. 2 eyes, 1 nose, 5 for the mouth |
Vampires & Mummies
You’ll need:
For both:
6 ounces white candy melts
¼ teaspoon shortening or coconut oil

A weird thing happened with my white melts. They got too hot and went from being smooth to sort of clumpy in 5 seconds too many. I stood there saying, "No. No no no. Please don't do this!" because I hate waste and really didn't want to throw out 6 ounces of candy melts. Then I thought about it and figured I could live with throwing out 3 ounces, but there was no reason I couldn't use a clumpy white melt for a mummy because their bandages are all sorts of messed up anyway.
So I started painting it onto a mummy and after I finished the first one, the melts magically smoothed out again! All I can figure is that they came down enough in temperature that they relaxed instead of staying seized up. I don't know. I was able to use them as normal at that point and alls well that ends well. But I wanted to mention it in case you encounter it. All may not be lost. Give it a minute and keep stirring it before ditching it.
For Mummies:
12 candy eyeballs (small or medium size)
 |
| Clumpy bandage spatula application |
 |
| Attach the eyes. |
Now, you could be done here. In fact, if you stopped here, you could call these ghosts. (Well, probably add a black quin for a mouth if you want to call them ghosts.) But if you really want to up the ante and make some bandages, allow the white melt to fully set. While they set, scoop about 1/4 cup of melt into a baggie and snip the tip and squeeze out candy melt in a zig zag pattern across the front and back of the marshmallow, thus giving you the classic bandaged mummy look.
 |
| The piping bag |
 |
| With the zig zag across the front - leave the eyes peeking out |
 |
| Now THIS is a mummy. |
For Vampires:
12 candy eyeballs (small or medium size)
12 black jimmies
18 red jimmies – 6 longish, 12 shortish
2 Tablespoons black dusting sugar (in small bowl)
 |
| Holding the pretzel stick, dip the top of the marshmallow into black dusting sugar. Once you do the top, carefully tip one side forward just a touch so that you achieve a little V shape toward the front of the forehead area. |
 |
| Add the eyeballs. Above them, add a black jimmie (slanted down in the middle) to serve as an eyebrow. Then add a red jimmie going straight across as a mouth, and 2 more coming down from the end of the straight one (to serve as bloody fangs.) |
There you have it. 6 adorable monsters that can spook up the top of any plain cupcake. If you make mini-cupcakes like I did, be aware that you’ll need to break in half the protruding part of the pretzel before sticking it on top of the cupcake (since it’s too long otherwise.) Also, the marshmallow is almost the same size as the mini-cupcake. If you make a standard sized cupcake, you can leave the pretzel whole, and the marshmallow looks more proportionate to the cupcake. But really, who cares? The marshmallow is the star of the show here and I’m thrilled with how they came out.


Hopefully the 2ndgraders will love them as much as I do!
 |
| Here's how I stored them. Most can go upside down because of their flat tops. Obviously the witches need to stay on their sides due to their pointy hats. And be careful not to crowd the bats because you don't want their wings to break. |
**I have no affiliation or relationship with any of the brands mentioned or linked in this post. All opinions and experiences expressed herein are my own.**
No comments:
Post a Comment
Please feel free to comment. However, please note that not all comments will be posted, and that it does take time to read through them, so your comments may not be read the day you write them.
Thanks to all for your thoughts.